How to Setup and Use Surfshark on Synology NAS
A Synology NAS (Network Attached Storage) device is an excellent solution for storing and sharing data across networks. Many businesses and individuals use it to manage files, host websites, and even stream media.
But just like any device connected to the internet, a NAS can be vulnerable to cyber threats. Using a VPN like Surfshark on your Synology NAS is one of the best ways to secure your data and protect your privacy.
In this guide, we will explain how to set up Surfshark on a Synology NAS and how to use it efficiently. We will also go through the benefits of using Surfshark on Synology, along with some common troubleshooting tips.
Why Use Surfshark on Synology NAS?
Before diving into setup, it is important to understand why Surfshark is useful for your NAS. A NAS often stores sensitive files, including personal documents or business data. Connecting directly to the internet without protection can leave this data exposed to cyberattacks or unwanted access.
With Surfshark installed, all outgoing and incoming traffic from your Synology device is encrypted. This ensures that no one, including your internet provider, hackers, or other third parties, can monitor your online activities.
Another major advantage is the ability to bypass regional restrictions. If you host or access content on your NAS, Surfshark allows you to connect through servers in different countries, expanding accessibility.
Setting Up Surfshark on Synology NAS
There are two main ways to set up Surfshark on a Synology NAS. You can configure it manually using the built-in VPN client on Synology, or you can set it up at the router level so all connected devices, including the NAS, are protected.
Below, we will focus on the manual setup using Synology’s VPN client.
Step 1: Log in to Your Synology NAS
Open your web browser and log in to the Synology DiskStation Manager (DSM). This is the control panel for your NAS where you will manage settings and applications.
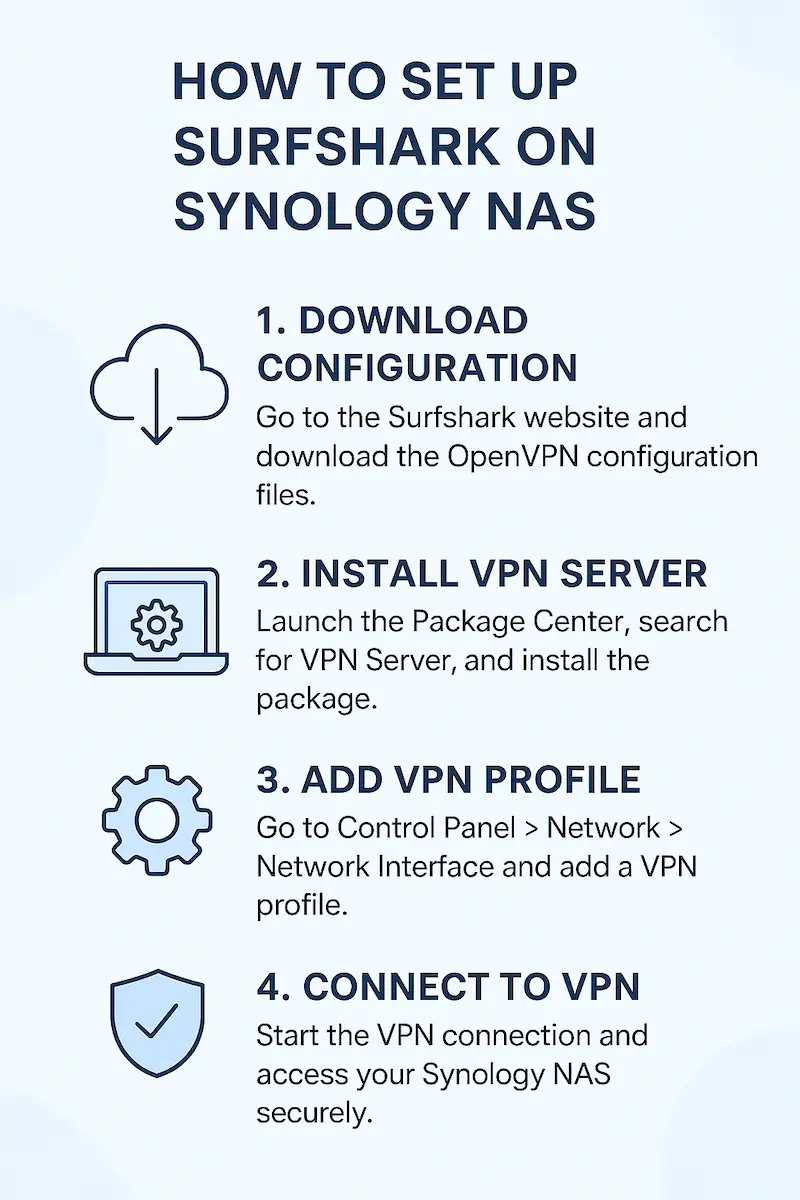
Step 2: Install VPN Server Package (Optional)
Some users prefer to run their own VPN server on the NAS, but in this case, we are using Surfshark’s servers. You do not need to install Synology’s VPN Server package unless you plan to host your own server.
Step 3: Open Control Panel
In DSM, go to Control Panel and find the Network section. Inside, you will see an option called Network Interface. This is where you will add your Surfshark VPN connection.
Step 4: Add a New VPN Profile
Click Create and then choose Create VPN Profile. You will now be asked to select a VPN connection type. Surfshark supports multiple protocols, including OpenVPN, WireGuard, and IKEv2.
For Synology, the most commonly used option is OpenVPN because of its balance between speed and security.
Step 5: Download Surfshark Configuration Files
Go to the Surfshark website, log in to your account, and download the OpenVPN configuration files. These files contain the server details needed for your NAS to connect to Surfshark. You can choose the server location closest to you for better performance.
Step 6: Upload Configuration to Synology
Return to your Synology interface and upload the configuration file you downloaded. You will also need to enter your Surfshark username and password, which can be found in your Surfshark account dashboard under manual setup credentials.
Step 7: Adjust Advanced Settings
During the setup, you may be prompted to enable options like:
- Use default gateway on remote network: This ensures all traffic goes through the VPN.
- Reconnect when the VPN connection is lost: Keeps your NAS protected at all times.
- Allow other network devices to connect through this NAS’s VPN connection: Useful if you want to extend VPN protection to other devices on the same network.
Enable the settings that fit your needs.
Step 8: Connect to Surfshark
After finishing setup, click Connect to establish a VPN connection. You can verify the connection status in the Network Interface menu. Once connected, your Synology NAS will route all traffic securely through Surfshark’s servers.
Using Surfshark on Synology NAS
After connecting to Surfshark, you can use your NAS just as before. The only difference is that all of your activity is encrypted. This means uploading, downloading, or streaming from the NAS is safer. If you host media, Surfshark also ensures that remote access stays private.
You can also change the VPN server whenever needed. For example, if you want to connect to a different region, you simply upload a new configuration file for that country’s server.
Benefits of Surfshark on Synology
There are several benefits of running Surfshark on your NAS:
- Privacy and Security: All traffic is encrypted, protecting against hackers and unwanted surveillance.
- Remote Access Protection: If you access your NAS remotely, the VPN prevents outsiders from intercepting your connection.
- Bypass Restrictions: Surfshark allows you to bypass geographical restrictions if you want to host or stream region-locked content.
- Cost-Effective: One Surfshark subscription supports unlimited devices, so you can protect your NAS along with other gadgets.
Troubleshooting Common Issues
Even with proper setup, you may run into issues while using Surfshark on Synology. Here are some common problems and fixes.
VPN Not Connecting
If the VPN refuses to connect, double-check that you uploaded the correct configuration file. Also, make sure your Surfshark credentials are valid and match the ones for manual setup, not your standard account login.
Slow Speeds
If you notice slow performance, try switching to another server location closer to you. Also, check if your router or internet connection is causing bottlenecks. WireGuard is faster than OpenVPN, so if Synology adds support, consider switching to it.
Auto-Reconnect Not Working
If your VPN disconnects often, make sure you have enabled the reconnect on connection loss option. Restarting the NAS after changes can also help.
File Access Delays
Sometimes VPN routing may cause delays when accessing large files. Switching to a faster Surfshark server often resolves this.
Conclusion
Setting up Surfshark on a Synology NAS is a smart way to protect your files and ensure private access. By routing your NAS traffic through Surfshark’s secure servers, you keep your data safe from prying eyes and enjoy more control over your online presence.
The setup process is straightforward once you download the right configuration files and upload them to your NAS. With Surfshark running, you gain better privacy, stronger security, and the freedom to bypass restrictions when needed.
For anyone relying on Synology NAS for storage or remote access, adding Surfshark is an essential step toward safer and more reliable use.